1. Introduction
Why should you read this documentation and why did we write it?
 On modern operation systems such as Windows XP and Windows Vista it's very hard to get old DOS games running. Just imagine the last time you have tried to run SimCity 2000, Stunts, Desert Strike or Street Rod. Most likely it has been years ago. Now we give you the opportunity to run your favorite classic in Windows XP/Vista (and even Windows 2000), doesn't that sound great?
Windows has several build-in tools but these tools can't really manage to get a lot of games running without crashing or glitches. And when you finally do get a certain game working by the usage of one of the tools it may run very slowly (or sometimes too fast), run without sound, crash a lot of times, mess up the graphics, etc. This is mainly the reason why this documentation page has been written and published by Res.
We hope the following text will make it more easy for you to get your favorite classic DOS games running.
Kind regards,
The www.Classic-gaming.net crew
2. Requirements
What do you need to get most DOS games running?
This may sound very stupid but the tool we will teach you does need a workstation that has as much memory as possible and an as fast as possible processor but the actual requirements all depends on what kind of games you want to run.
 You may ask yourself, why? Well the tool in question is called DOSBox; DOSBox emulates* a good old workstation such as a 286, 386, 486 and even early Pentiums. Your workstation may be able to emulate* a Pentium or only a 286 pc, this all depends on the specifications that your workstation has. For instance an AMD Athlon XP 2000+ featuring 1024MB of memory may be able to emulate* a 486 but is not able to emulate* a Pentium 100MHz. It mainly works like this: when you have a fast workstation you may be able to emulate* a faster 'old' machine such as a Pentium 133MHz, but when you have a slower workstation such as an Pentium III 800MHz your workstation will only be able to emulate* an 286 or maybe early 386 machines.
* Read as: a program/tool that acts like DOS but is just a virtual PC
3. Getting started...
Where can I get DOSBox?
There are several ways to get the latest version for DOSBox. First of all we have it available for download in our Application selection (click here to go directly to our DOSBox page), the second way is by visiting the DOSBox website at www.dosbox.com and download it in the Downloads selection. We strongly suggest you to use the DOSbox site when you aren't running a Windows operating system because we at www.classic-gaming.net only offer a download for Windows.
How do I install DOSBox?
You can easily install DOSBox by using the 'next-next-next' installation method. A shortcut to run DOSBox will appear in Windows' startmenu after successfully installing DOSbox. For users that aren't familar with the next-next-next method take a look at the following steps along with descriptions otherwise just skip the four steps below and continue reading the next part of this documentation.
Step 1 to install DOSBox
Perhaps you will get a box that DOSBox isn't signed by Microsoft, just accept this window otherwise you won't be able to install DOSBox. The first screen that will pop-up is DOSBox's license agreement, after reading it click Next.
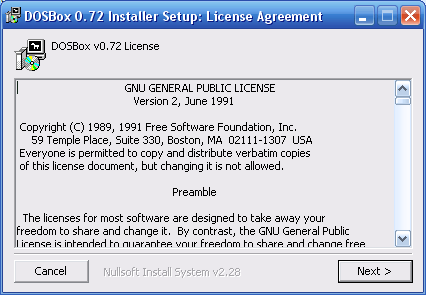
Screenshot 1: The first DOSBox installation window
Step 2 to install DOSBox
The next window has just two options: Core files and Desktop Shortcut. You can't change the value of Core Files but you can change the Desktop Shortcut box if you prefer not to have a DOSBox shortcut on your computer's desktop. After you made your decision just click Next.
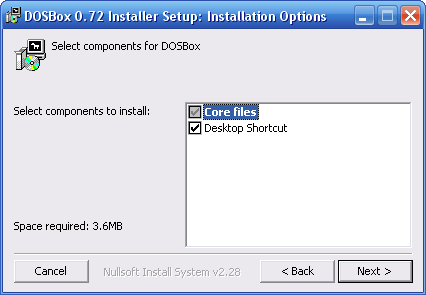
Screenshot 2: Choose what you like to install
Step 3 to install DOSBox
When you prefer to install DOSBox on another location on your harddisk you can easily change it here. Finally click Install to start installing DOSBox on your workstation.
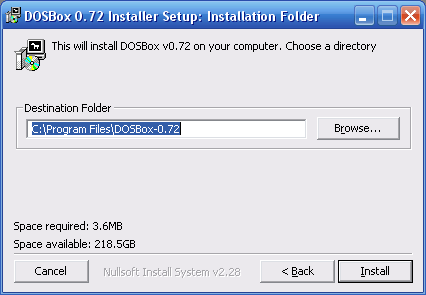
Screenshot 3: Choose where you would like to install DOSBox
Step 4 to install DOSBox
The following screen normally appears when everything went like it should. DOSBox will be installed and in the end the installer will display the text "Completed". DOSBox has been installed when the text "Completed" is visible on your screen. In the last case just click Close to end the installation wizard.
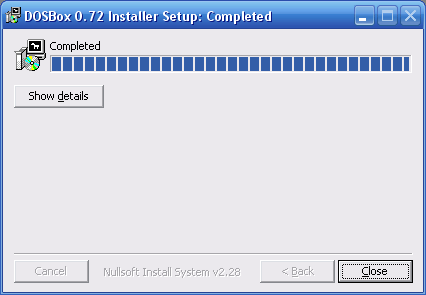
Screenshot 4: DOSBox has successfully been installed
4. Learn the basics...
What do I need to get a game running in DOSBox?
Well first of all we'll teach you some basic DOS commands, otherwise you won't be able to run a single title. There are applications that offer a grapical environment (a so called GUI) to program DOSBox and get oldies running but it's always better to know the basics. So what you need is a working copy of DOSBox and getting familar with the commands we'll teach you in this chapter, it won't be difficult.
The harddisk structure in DOS(Box)
Most of us are familar with the Windows Explorer/My Computer environment, simply said: a graphical environment to browse your computer's harddisk, cd-rom drive, usb-stick, ecetera. DOS(Box) works almost the same but there are two slight differences. First of all everything is written in capitals in DOS so it doesn't matter if you enter DOOM, doom or doOM; it's all correct. Second DOS only supports directorynames and filenames up to eight charactors this is why for instance "Program Files" will be called "Progra~1" in DOS. Along with the example of Progra~1 I will explain you why it's not "Programf" like you would expect, this is because DOS replaces the last two charactors of a file/directoryname longer than 8 charactors with a ~1 or higher number*.
* If there are two or more identical files/directories the second one will be named ~2, and the third ~3 and so on.
Here is just an example of what your computer's harddisk structure could look like in DOS(Box).
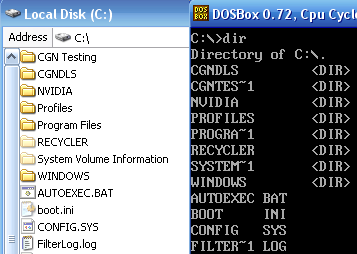
Screenshot 5: As you can see longer file/directorynames have changed a bit
Let's start DOSBox
Let's start using DOSBox, just double click on the DOSBox shortcut on your desktop or use the shortcut in your Startmenu to start using DOSBox. Below is a screenshot of the first screen you'll see.
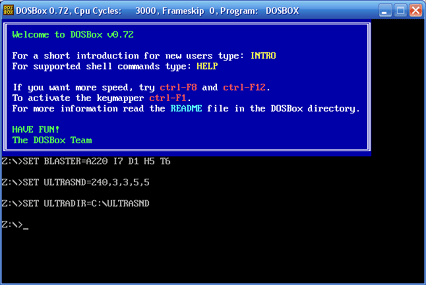
Screenshot 6: What you normally see when you start DOSBox
The mount command
One of the most basic things in DOSBox is the 'mount' command. Mount is being used to tell DOSBox where your computer's diskdrives are. When you start DOSBox there is only a virtual Z drive (Z:\>) but this is not your computer's C drive or cd-rom player. The first thing we have to do is tell DOSBox where our data is being stored, for this we use the mount command.
The mount command works as following "mount dosboxdriveletter computerdriveletter", an example will be "mount c c:\". In the last example we mount your computer's C drive as C drive in DOSBox. DOSBox will display a message when everything went like it should. When you enter C: in DOSBox you'll go to your local C drive and DOSBox will display C:\> in front of the blinking cursor.
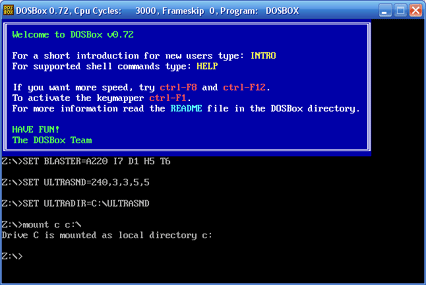
Screenshot 7: Mount a local drive in DOSBox
When you want to tell DOSBox that for instance your second harddisk has the local driveletter F but want DOSBox to see it as D drive you'll use "mount d f:\". Now when you enter D: in DOSBox you will go to your local drive F. Concerning using mount to mount your computer's cd-rom you have to add one extra command called "-t cdrom" to your mount string. For instance when you want to mount your local cd-rom drive located at D: you'll have to use "mount d d:\ -t cdrom" to let DOSBox know that you want to mount a cd-rom drive.
Please note: when DOSBox doesn't let you enter a \ you can also use a /
How to browse your computer in DOS(Box)
To browse your computer in DOS there are two mainly used commands, the first one is called dir. When you enter the command "dir" you will see what is in the directory/folder you're currently looking in. For instance when you're at C:\ and you'll use the dir command you'll see what files and folders are located in the root of the mounted C drive. But when you currently are located in the folder C:\Windows and enter dir you'll see the files and folders located in the directory C:\Windows.
The next command is "cd", cd stands for change directory. Cd is being used to change you current location, for instance when you currently are located at C:\ and you want to go to a folder called Games (located at C:\Games) you'll have to enter "cd games", now your current location will change to C:\Games. When you want to go to a higher level (the previous directory), you can use "cd ..", cd .. will change your current location to a higher level, for instance when you're at C:\Windows\system then you will go to C:\Windows when you use "cd ..". When you want to go to the root of your current location you can use "cd \".
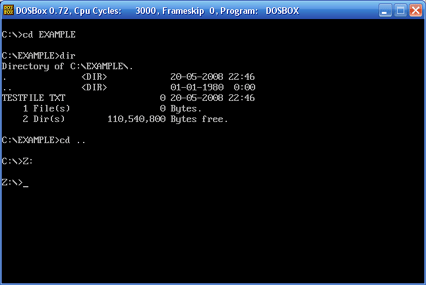
Screenshot 8: Example of browsing in DOSBox
Now you're able to browse your mounted drives in DOSBox, but perhaps you're wondering "How do I change to another drive". Well to answer the question this is really easy, you only have to enter the driveletter followed by : for instance you have to enter C: to go to the mounted C drive.
When you get familar using the commands mount, cd, dir, etc. you'll be able to browse your computer without any problems. So I would say, let's finally start playing classics by the usage of the next chapter!
5. Let's play games...
Install/unpack/copy the game to on your computer
The first step to get a game running is installing/unpacking the game. When you use official CGN (Classic Gaming Network) packages downloaded form this website you normally won't discover any difficulties. You can recognise the packages in many ways, for instance the filename will contain [CGN] and the installer will start with a CGN Installer screen. Other files will be packed in .zip or .rar format, you can just unpack the packages by the usage of WinRAR. The most important thing is the location where you install/unpack a game. I want to suggest you to use a simple and short directory structure (without spaces and strange charactors) for instance C:\GAMES\KEEN4 will do the job; don't use C:\Program Files\CGN\Commander Keen 4 because this will save a lot of time and energy.
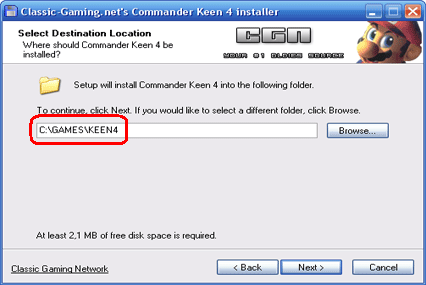
Screenshot 9: Remember where you install the game
Navigate to the game's location in DOSBox
After installing/unpacking a game the file will be somewhere on your computer. First of all we have to tell DOSBox on which drive the game is located (example: C:\GAMES\KEEN4) so first of all mount the drive you've used to install/unpack the game; in this case "mount c c:\" will mount the C drive. Now change to the drive in question by the usage of the driveletter: command, in this case C:. Now your current location will change to C:\>, the next thing is browse to the directory where the game is located, in this case C:\GAMES\KEEN4, you have to enter "cd GAMES" to go to C:\GAMES and then "CD KEEN4" to go to the KEEN4 directory (please note: you can also enter "CD GAMES\KEEN4" to go to the directory in question). Now you're located at the directory of the game.
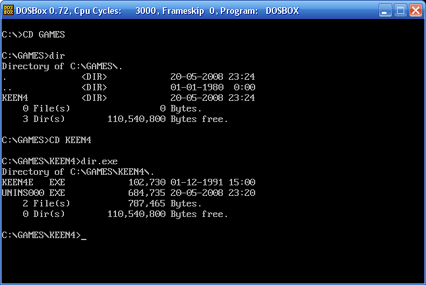
Screenshot 10: Example of browsing to the game's directory and find the executable
Start the game
The next thing we have to do is look for the executable file to start the game. To find the executable you can use the "dir" command, most games will start by the usage of a .exe or .com file. To look only for .exe or .com files at your current location you can use "dir.exe" or "dir.com"; now you will only see .com or .exe files on your current location. The final thing we have to do is enter the executables filename and hit enter, in this case KEEN4E.EXE . DOSBox will run the executable and you can start playing the game just like the good old days.
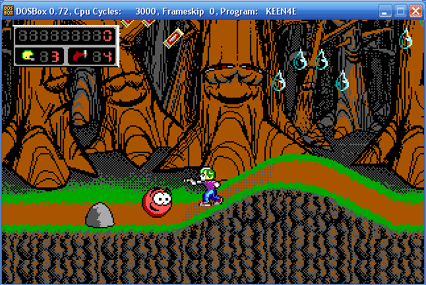
Screenshot 11: The final result; a good old classic running in Windows XP/Vista
6. Frequently Asked Questions
Is it possible to play a game in full-screen?
Yes, it is possible to run a game in full-screen instead of a window, just hit ALT and ENTER at once and the screensize will change in no-time! Just hit the same combination to go back to a windowed view.
When I start a game there is no sound, why?
Most likely the game is not configured correctly. Most game have an in-game option to change the settings or a setup.exe file in the game's main directory. In most cases you can use an autodetect option, otherwise you can fill in: SoundBlaser, Address: 220, DMA: 1, IRQ: 5 and you will be able to hear the game's sound effects and sometimes even background music. In the case of midi you can enter 330 to get it working.
Game -x- runs to fast/slow, how do I solve this issue?
You can speed up a game by increasing the number of cycles used by DOSBox. Just hit CTRL+F12 to speed it up but there is a limit, this is your computer's maximum emulation speed so when the game only runs only slower and slower after using the keys your workstation is unable to take care of the game. To slow down the game/decrease the number of cycles you can use the buttons CTRL+F10. Please note: you can read the number of cycles at the top of the DOSBox window.
My mouse does only work in the DOSBox window, can I get it out of it?
Yes, you can get it out of the window. Normally when you click on DOSBox window your cursor will be locked in the DOSBox screen. To unlock to it you can use the buttons CTRL and F10 at once.
There is something wrong with this guide/faq, where can I post this?
First of all you can use our Forum and post it there. Another way is send the writer/copyright owner (Res) of this document a Personal Message, just click here to leave a message.
Personal
Statistics
| Numbers: | |
| Members: | 571261 |
| Games: | 973 |
| Files: | 11467 |
| Apps: | 50 |
| Online: | |
| Members: | 8 |
| Veterans: | 0 |
| Premium: | 0 |
| Mods: | 0 |
| Admins: | 0 |
| New today: | |
| Games: | 0 |
| Files: | 0 |
| Apps: | 0 |
| News: | 0 |
| Members: | 696 |
Affiliates
AbandonwareRing
SquakeNet.com
Abandonware Dos
Computer Emuzone
Free Game Empire
Free Games Blog
Game Reserve
Glenn's Guides
Lostgames
Oldgame.cz
Oldschool Computer
Smush The Cat
The House Of Games
The Joystick
